How to admit an Emergency Admission to a ward using CapMan
DO NOT USE THIS PROCESS FOR AN ELECTIVE ADMISSION
Instruction
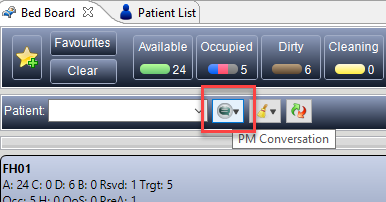
On the Bed Board, click the button for PM Conversation
Select CM Emergency Inpatient Admission
This will open the PM Office conversation and allow you to complete the rest of the admission details
Search Techniques
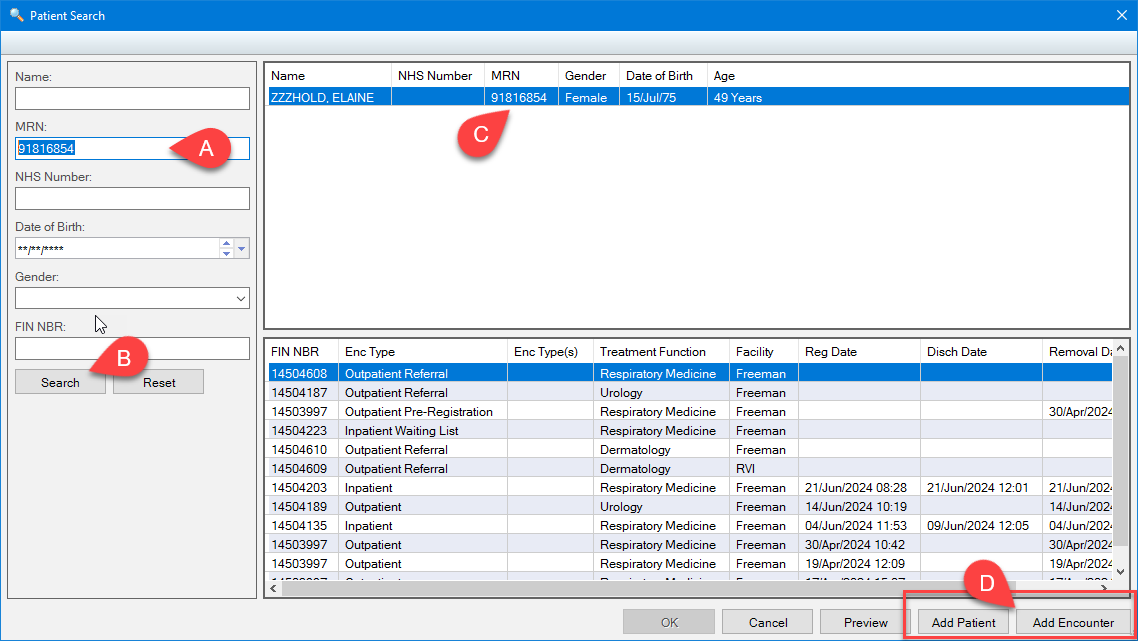
Before registering a new patient you must ensure the patient is not already registered
Search for your patient:
a. Using their MRN or NHS Number (If you don’t have a number, use the patient initials and DOB)
b. Click the Search button
c. Select the correct patient
d. Select Add Encounter (note if your patient is new to the Trust and the patient has not been found during the search, select Add Patient):
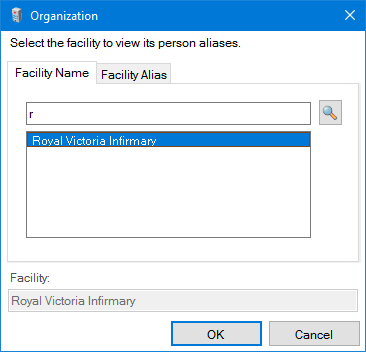
The Organisation field requires you to add the hospital where you are based. This example shows the RVI: Type the letter R, click the Magnifying Glass to display and select Royal Victoria Infirmary:
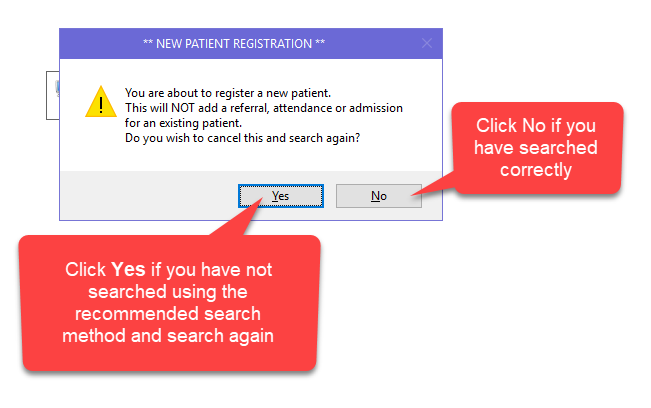
If you are registering a new patient, a warning will ask if you are absolutely certain this is a new patient you are registering. If you are uncertain that this is a new patient, select Yes. If you are certain this is a new patient that hasn’t been seen at this Trust in the past, select No:
The Add Person form will display. All yellow fields are Mandatory fields. You must complete these fields in order to add the admission
The Add Person form will display. All yellow fields are Mandatory fields. You must complete these fields in order to add the admission (if you are not registering a new patient, check the demographic details are correct and update if required using the steps below).
If you cannot see the mandatory fields, right-click anywhere in the grey area of the form and select Highlight Required Fields
Add the Patient NHS Number – although this is not a mandatory field, if the patient NHS Number is known, it should be added to the patient record. If you had searched for your patient using initials and Date of Birth, you must complete the patient Surname and First Name
Complete the following fields:
Date of Birth
Gender
Ethnic Category
UK Resident for 12 months?
Administrative Category (this will default to NHS if you selected Yes to the previous ‘UK Resident for 12 months?’ question)
GP Details
The next field to complete is the GP. You must associate a GP Practice with the patient GP, otherwise the patient cannot be saved
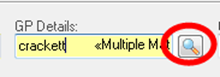
In the GP Details field, type the name of the GP you wish to find and click the magnifying glass to search
In the top part of the screen, select the correct GP
At the bottom of this screen select the correct GP Practice – click OK. This will complete both the GP and the GP practice
If the patient does not have a GP or you do not know it and require to admit them immediately, type “Notk” into the GP name field and press the magnifying glass. Select either “GP practice not known” or “patient does not have a GP” from the search results, and press OK.
Telephone Number
The options are Home Phone / Mobile phone / Work Phone. If the patient phone number is not known, or they do not have a telephone, YOU MUST ENTER NK into the home phone field. Do not add a series of digits or a mobile number into the Home Phone field. If the patient has a mobile number but not a home number, you should add NK into the home number field and the mobile number into the Mobile Phone field as this assists the DNA Reminder Service
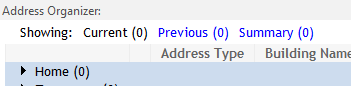
Home Address – UK Resident
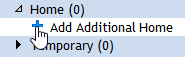
To add a new Home Address click the small arrow to the left of Home (0) in the Address Organiser in the lower part of the screen
Click the blue plus button to open the Address Viewer
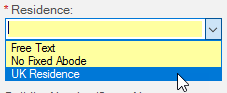
From the Residence drop-down menu, select UK Residence, click on the Address Search button
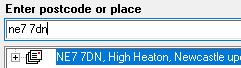
Enter the Postcode, the search will then occur automatically
Click Select to the top right of the window. You may have to repeat this step again if there are several residences at the postcode you have selected
Select the relevant building number and click Accept to the top right
The address details should now show on the form. Close this by clicking OK and return to the Add Patient screen
Once the demographics have been added, the visit details will need to be completed.
Visit Details Tab
From the Visit Details Tab, complete the missing fields:
Admission Method: Who sent the patient to your ward
Source of Admission: Where the patient has come from (if it’s their home address; select Usual Place of Residence)
Referring Clinician: Use the magnifying glass to locate the referring clinician typing the surname and first name of the referring clinician. If the referring clinician is not found, use NotKnown – Referring Clinician Not Known
Lead Clinician: Type the Surname of the Lead Clinician, click the magnifying glass, double click to select the correct clinician
Treatment Function: Select the correct treatment from the dropdown list
Ward: Click the dropdown and select the ward the patient is being admitted to – click the Bedboard tab
Select the Bay /Bed for the patient, click OK
Visit Date:Enter a “T” to add today’s date
Visit Time: Enter a “N” to add the current time (now)
Next of Kin Tab
From the Next of Kin Tab, search for the next of kin:
Complete the NOKCONFIRMATION field. If Patient Refused to Provide NOK Confirmation or Unable to Provide NOK is selected, click OK to complete the admission. For NOK Confirmed you will need to complete further information (see below)
NOK Confirmed
Complete the NOKs Relationship to Patient field
Click the Search for Next of Kin button to search for the next of kin. If the next of kin is known to the Trust, select the person and click OK (if the next of kin is a known patient, their demographic details will populate and the admission can be completed by selecting OK at the bottom right of the screen). If the next of kin is not known to the Trust, follow the steps below:
If the Search for Next of Kin returns no results, select Add Patient
Add the gender for the next of kin
Add a contact telephone number for the next of kin
Enter the Postcode for the next of kin and search for their address in the same way that the patient address was located earlier
For Paediatric Patients, further information will need to be completed on the Guardian/Parental Responsibility Tab using the same process as adding Next of Kin
Once all information has been entered, click OK at the bottom right to complete the admission