Clinic Letter Review Using the Audio File
Scenario
The current Fluency Direct Digital Dictation software package allows for both voice recognition and the creation of an audio file. Some staff will wish to create a letter entirely by voice recognition, some entirely by audio file creation, and others as a hybrid of these two methods.
As long as Fluency Direct was used to dictate the letter and the recording was stopped before the letter was saved, an audio file should be available for reviewing the clinic letter.
Instructions
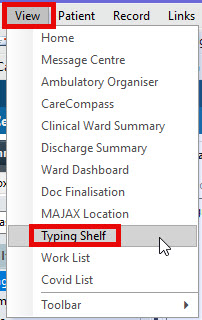
- From within Powerchart, launch Typing Shelf from either the top grey menu bar
 or the View menu.
- Click on the funnel icon to filter for correct clinic by a combination of date, department, resource, and location. You can also choose to include Completed in your search. To view the filtered results, you must click somewhere outside of the window as there is no enter button.

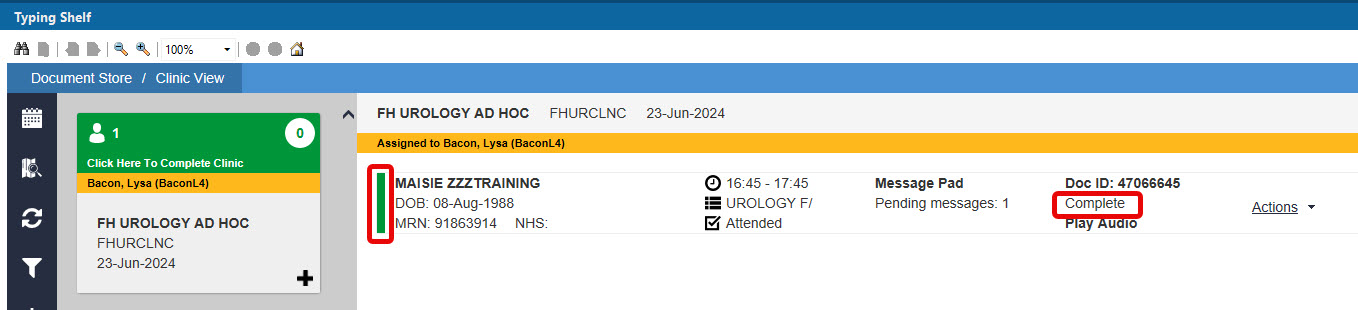
- From the list of results, click within the box of the clinic you were looking for to pull the list of appointments. Please note, clicking the “+” in the bottom right corner, also found in the black, left-hand vertical menu, will give a document status summary for the entire clinic.

- Click on Message Pad to review messages. Mark message Complete, as appropriate.
- Document status: Not Started, Awaiting Finalisation, Awaiting Signature, Completed or Not Required.
- Press Play Audio to listen to file.

- • A playback control bar will open and always float in front of other windows.
- • Playback speed can be switched between Normal and Slow.
- • If select Hide, the menu bar disappears. To bring back, click on Play Audio again; playback will start from the beginning of the file.
- • Press
 to begin playing the audio or press
  to pause.
- • The numbers at the end of the progress bar represent time elapsed/total time where time is in the format of mm:ss.
- Actions drop down menu:
View patient will open the patient’s record.
Message pad will open message pad.
View document will open document as view only.
Edit document will open the document for editing.
Document not required to be applied as appropriate.
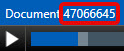
Please ensure that the audio file, document, and patient record being reviewed are for the correct patient. The audio file and document should both share the same
Document Number.
For an audio file, the document number is found in the top left corner of the audio playback control bar.
For a letter, click on “info” in the blue menu bar at the top of the document.

The document number is in the top left corner of the window that opens.

- In the line of the patient requiring a letter to be reviewed, click on Actions.
Note: If you are expecting to see a document for a patient but the document status in Typing Shelf says, “Not Started”, it could be that:
• it was never done for that patient; remind clinician to create letter.
• something went wrong whilst saving or it was recorded against the wrong patient; the clinician will need to create letter again.
• the letter was recorded against the correct patient but wrong encounter.
If letter was recorded against the correct patient but wrong encounter, the following is a solution:
1. Click on View in the top grey menu bar.
2. Click on Draft Documents from the drop-down list.
3. In the View By field, top right of screen, select Departmental Documents. This option will allow you to see all saved draft documents within your department.

4. Click anywhere on the line of the document you wish to edit. The document will open for viewing.
5. Click on Edit Document.
6. Select Play Audio and make corrections.
7. When finished, click on Finalise but be sure to let the clinician know that it is not ready for document signing.
8. Find and open the document in DocStore.
9. Select Duplicate.
10. Select correct Encounter from the drop-down list.
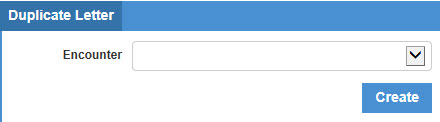
11. Click Create.
12. Please be aware that when “duplicating”, data pulled from the patient record into the original letter , i.e. Medications, Problem List, Allergies, etc. will not update in the duplicate. If any changes have been made in the patient’s record, this information will have to be manually updated.
13. When finished, click on Save as Draft.
14. Go to Draft Documents and reject the letter that was created on the wrong encounter.
- Choose Edit Document. The document will open.
- Select Play Audio in the blue menu bar at the top of the document that opened. The audio playback control bar will float in front of any open window. You can reposition the control bar by clicking on it, holding, and dragging to another area of the screen. Press the play button and you are now ready to correct the voice recognition typing in the document.

Audio files can only be listened to from a Trust device. This does not work when logging on to RemoteCare on a non-Trust device via a Swivel PIN.
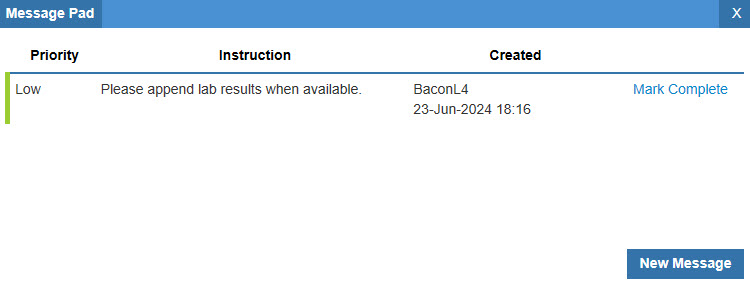
- Add/amend as instructed through your usual process whether it be verbal, via e-mail or Message Pad. To view messages in Message Pad, click on Message Pad in the blue bar at the top of the document.

A window opens; click on message to view. You can click Mark as Complete when actioned.
To write your own message, click on New Message.
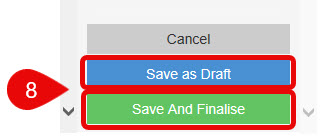
- When you have finished reviewing the document, click on Save and Finalise. The document is now added to the Doc Signing list waiting for the clinician to sign. If you have not finished, click on Save as Draft.
- In Typing Shelf, signed documentation will have a status of complete. The vertical line at the beginning of the patient’s information bar will turn from blue to green to indicate complete.
- Please refer to Print/Send Documents for how to send the letter using the Document Store Print application.