How to Grant Proxy Access to your Message Centre Inbox

Introduction

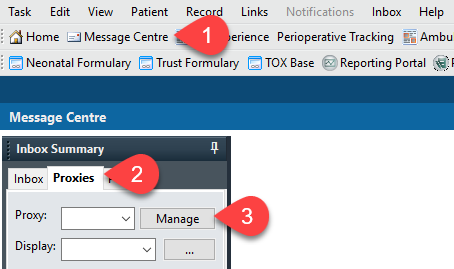
Proxies allow you to give a colleague permission to access your mailbox from their Proxies tab.

They are typically used when you are on holiday, similar to setting an “Out of Office,” and enable others to act on your behalf (for example, managing emails or endorsing results).

Instruction
  1. Navigate to Message Centre
  2. Select the Proxies tab
  3. Select Manage

  1. Select Add towards the bottom of the left panel

  1. Search for the user you want to add as a proxy
  2. To add more than one user, click the down arrow and add the next person in the search box
  3. Set the begin date and time (at least one minute ahead of the current computer time) and the desired end date and time
  4. To ensure full access click Grant All. You may also select specific items and then click Grant.
  5. Click Accept & Next
    NOTE: Clicking on ‘OK’ will cancel out the changes made and revert to the previous screen

  1. The users name(s) will now display in the Proxies Given by Me panel
  2. Click OK

  1. Confirmation message Setting saved successfully will display
  2. Click OK

  1. The selected user(s) will now have access to all granted items during the indicated timeframe from their Proxy tab.

NOTE: It is your responsibility to verify your proxy assignment after completing the process to ensure it has been applied correctly.

In exceptional circumstances where the inbox owner cannot assign a proxy (e.g., due to an emergency), Service Desk can provide access.


Updated: 18 November 2025