Print Settings and Filters
Overview
The Document Store Printing Application contains a list of menu items down the left-hand panel. The Menu items you see will be determined by your role, so you might not see the same options as those that are displayed here.
Settings
- The first time you open the Document Store Print Application, use the Settings menu to select the defaults for the documents you want to see.
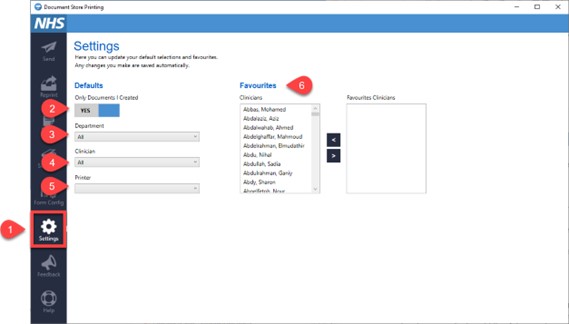
- Select which documents you want to see – created by you or all documents
- Select the Department you want to see, if you belong to more than one
- If you only want to see a specific Clinicians letters, select their name from this list (type the first few letters of their surname to filter the list)
- Set your default Printer
- You can also set your favourite Clinicians so that they appear at the top of your list. To do this, select their name from the panel on the left and move their name to the panel on the right, using the arrows in the middle of the panels
Once selected your settings will remain in place.
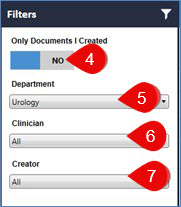
Filters
- If you don’t see the letter that you are looking for then return to the Settings
 menu and check that you have the correct filters set
OR
- You can also use the Filter button from the top right of the Send screen
- Click Filter

Check that you have selected:
- The correct option for Only Documents I Created
- The correct Department
- The correct Clinician (if appropriate)
- From this screen you can also filter the list to the person who created the letter (if appropriate)
Updated: 3 June 2026