How to Launch and Set Up for First Time Use
This guide will show you how to launch and set up Fluency Direct, the Trust supported Digital Dictation software, for first time use.
Instructions
- You have launched Fluency Direct by either double clicking on the desktop shortcut icon

or
searched for the Fluency Direct app by typing Fluency into the Windows search bar, found at the bottom left of the screen. If the Fluency Direct app has been identified as the Best Match, it will be highlighted. Press the return key to launch the app. Otherwise, select the correct search result and press return.

Pin the application to your task bar for easy access by clicking on Pin to Taskbar on the right hand side of options in the image above. Or you can right click on the Fluency Desktop icon on the desktop, select show more options and click on Pin to taskbar.
Auto-start is no longer enabled for Fluency Direct. You will need to launch manually after restarting a computer.
- The Control Bar, called the ‘Pill’ will appear on your desktop and your name will populate if you have a license.

• Drag the Pill to any location on the screen or dock it to any edge of the screen.
• To dock, click and drag the Pill to a screen edge. The screen edge will become highlighted when you near it. Release the mouse key and it will dock.
• The app will remember the location of the Pill and open in the same position each time you log in.
- Click within the Pill’s solid grey area for a drop-down menu to access settings and tools.
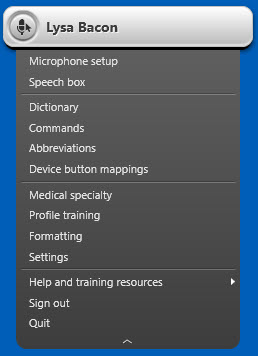
- Select Microphone Setup in the Pill drop-down menu.
The use of a mobile device as a microphone is currently not enabled for Fluency Direct v12 but is being considered for a later release.
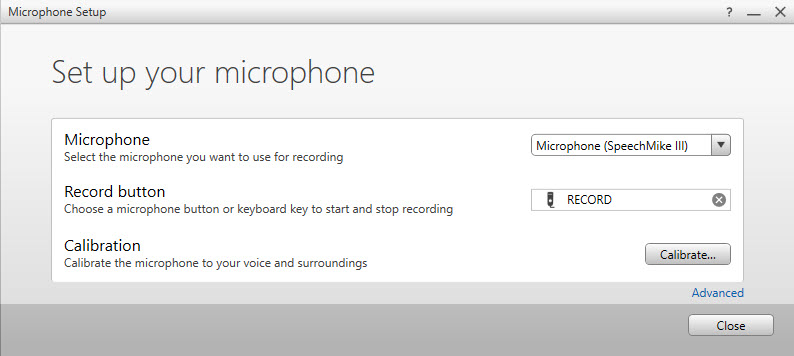
- Microphone – If your microphone is already connected, select it from the drop-down list. Otherwise, connect and then select from list
- Record button – Select the microphone button or keyboard key that you wish to use to start and stop recording. Click the X to remove the selection.
- Calibration – You will be prompted to read a paragraph to calibrate your microphone to your specific voice and surroundings.
Calibration requires a minimum of 20 seconds of audio to adjust the gain properly. Gain is different from the volume slider and impacts directly on recognition quality.
You should perform a calibration every two weeks and when you change your microphone or surroundings for best results.
- Advanced – These options will allow you to assign a device button, set the recording mode (text only, command only or standard which is both text and command) and the recording behaviour (hold to talk vs toggle to talk).
Suggested Microphone Habits:
• Hold the microphone 4-6 inches from mouth.
• Check microphone settings to ensure correct microphone selected and record buttons are appropriately set.
• Gather your thoughts and assemble any pertinent information prior to dictating.
• Dictate in a quiet area, with minimal background noise. Calibrate if environment changes.
• Say in full thoughts or sentences, consistently and evenly, avoiding fragmented dictations.
• Use correct verbiage and grammar – including punctuation.
• Say clearly, at a regular pace – articulate properly without over enunciating or saying too slowly.
• Enunciate words that can be misunderstood: abduction vs. adduction and hyper vs hypo.
• Avoid using slang, acronyms, and/or coined terms.
• Be sure to wait until recording has begun before beginning to dictate and only releasing the record button (if using Hold to Talk) or recording is turned off (if using Toggle to Talk) after dictation is complete. This prevents words from being “clipped” from the start or tail end of the dictation.
• Stop recording when taking a pause from dictation. This is to prevent capturing other conversations or background noises.
• Avoid heavy breathing or coughing into the microphone while recording.
• Never allow another person to dictate under your login. This will negatively affect your recognition quality.
- After you have selected and calibrated your microphone, you will have the option to complete voice Profile Training. It only takes a few minutes to complete. Though not required, it is recommended for best recognition results. You can return at any time through the Control Bar menu.
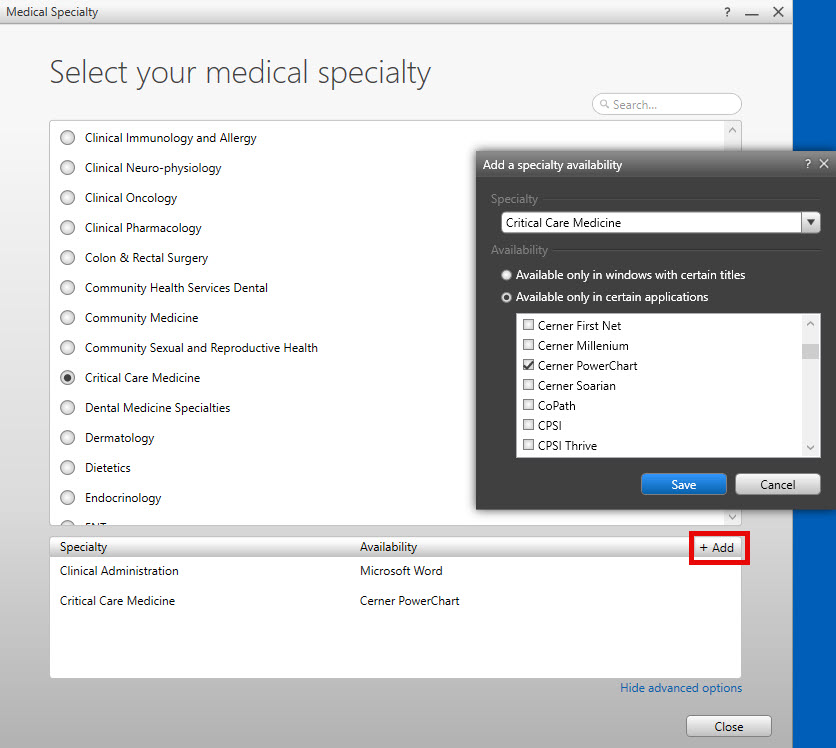
- Select Medical Specialty from the Control Bar drop-down menu. This optimizes the vocabulary for the types of documents you will be dictating. A user’s specialty can be configured based on focused window or application. For example, “Clinical Administration” can be used for email and a specific medical specialty for clinical letters created in Powerchart.
- Further personalisation options found in the Control Bar are useful but not required for first time use. Rather, personalisation develops with use. These options include:
Dictionary – Create a custom dictionary of Names, Locations, Medications, Procedures, Diagnoses, and Excluded Words.
Abbreviations – Create a collection of abbreviations. This is a list of words or phrases that you use repeatedly but abbreviate when saying.
Commands – Create commands to insert snippets of text, perform keyboard shortcuts and mimic mouse movements. For better recognition, press the ‘Play’ button on the SpeechMike when saying commands. In doing so, Fluency Direct expects a command as opposed to something that could be typed.
Formatting – This provides additional options related to the display and rendering of the dictation and draft text as regards numbers, measurements, symbols, date & time, and spacing. For more information, please click here.
- The Pill will display a variety of colours as a quick visual cue for the user to know when to begin saying or if there is an issue with the microphone.

Voice recognition typing and audio recording are BOTH working.

Audio recording is working but voice recognition typing is not.
If the Pill is either red or yellow, neither audio recording nor voice recognition typing are working.