- You have launched Fluency Direct by either double clicking on the desktop shortcut icon or searched for the Fluency Direct app by typing Fluency into the Windows search bar, found at the bottom left of the screen. You may also pin the application to the task bar for quick access.
Fluency Direct does NOT autostart. You must launch the software in order to dicate. Please review this
guide for information, if required. The same guide also describes how to set up the software for first time use.
- From within Powerchart, you have opened the patient’s record on the correct encounter.
- The patient’s MRN will populate in the Pill. Confirm that the MRN in the Pill is that of the patient for whom you wish to dictate a document.

- Select Document Creation from the blue, left-hand side menu.
- Complete the new document details box.
The encounter, department and lead clinician fields will autofill with the information matching the encounter that the patient record was opened on. If the correct encounter was not selected, you can select the correct information from each field’s drop-down menu.
- The selected template opens.
- Dictate directly into a text field within the template
- Click on a text field, indicated by a pencil icon on the right-hand side.
- Press and hold Record to dictate directly.
- Release Record when not dictating.
- Repeat steps ii and iii when you wish to dictate.
For reviewing the patient’s record while dictating, you can use the Tear Off function. This will allow you to view the letter in one window and the patient record in another.
- Current window should be the clinical letter.
- Click on Tear Off in the top grey menu bar.

- The clinical letter window is now a new window and can be dragged to one side of the screen or onto another display screen.
- The background window is the patient record, and you can select whichever section you wish to review.
- There are two ways to correct mistakes.
In-line Correction
In-line correction will only make a correction to the text in the current documentation. On occasion, Fluency Direct might misrecognise a spoken word or phrase. This misrecognition is not necessarily because a word or phrase is missing from the underlying vocabulary domain or user dictionary but could be because of other factors such as background noise or spoken tone.
To correct using in-line correction:
- Say “select [text]” or use the keyboard and mouse to highlight text.
- Say “[text]” and the text is replaced.
Error Correction Window
If you routinely notice the system making the same errors repeatedly, there might be a problem with the underlying vocabulary domain. The misrecognised word or phrase might not be part of the domain, or the domain has never seen the desired word or phrase before in the existing context. By using the error correction window, you can force Fluency Direct to learn unfamiliar words or phrases to react properly every time the newly learned utterance appears in dictation.
To correct using the error correction window:
- See the error in your dictated text.
- Say “select [text]”.
- Say “correct selection” to open the error correction window.
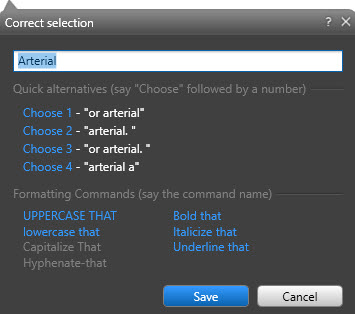
- You will be presented with a list of choices. To accept a choice, say “choose [number]”.
- Below the choices are a list of formatting commands. To use, say the command name.
- Spell Mode will allow you to correct the spelling of a word. It is limited to spelling only and does not present an option to save it to one’s dictionary.
- Highlight the word to correct.
- Enable Spell Mode by saying “spell mode”.
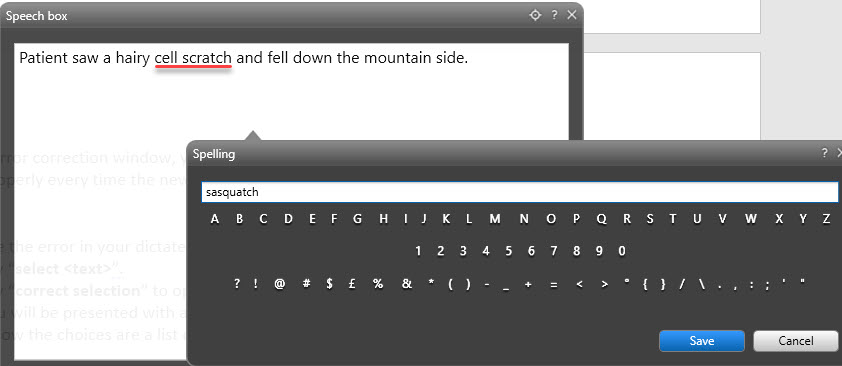
- Vocally spell the word.
- Say “save”.
- The Fluency Direct Dictionary allows you to create a custom dictionary of Names, Locations, Medications, Procedures, Diagnoses, and Excluded Words that you use often to ensure recognition each time.
Adding a Dictionary Entry
- Say “add to dictionary”.
- The Add a word window will appear.
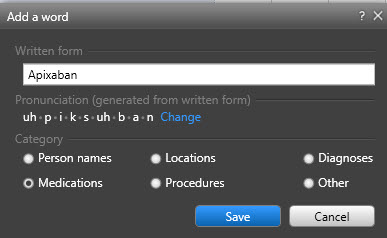
- Enter the written for of the word to be added to the dictionary.
- Based on the written form, the pronunciation will be created. You can change this by clicking on the blue Change link.
- Select the Record pronunciation tab.
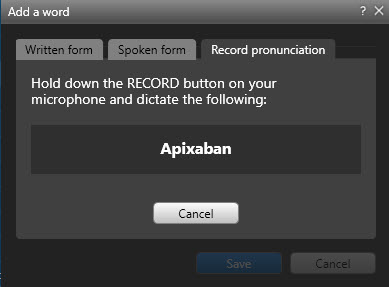
- Hold down the Record button and dictate the word.
- You will then be returned to the Add a Word dialog.
- Select the category for the dictionary entry.
- Click Save or say “save” to finish.
- Fluency Direct allows for custom commands to be created that will automate single or multi-step actions with voice. These can be as simple as a voice command to pull in a snippet of text, or a complex set of actions that automate otherwise multiple-click workflows.
How to create signature autotext:
- Press Play and say “open commands”.
- Select command group. You should have a personal group at the top of the list called “Your firstname Your surname’s Commands”.
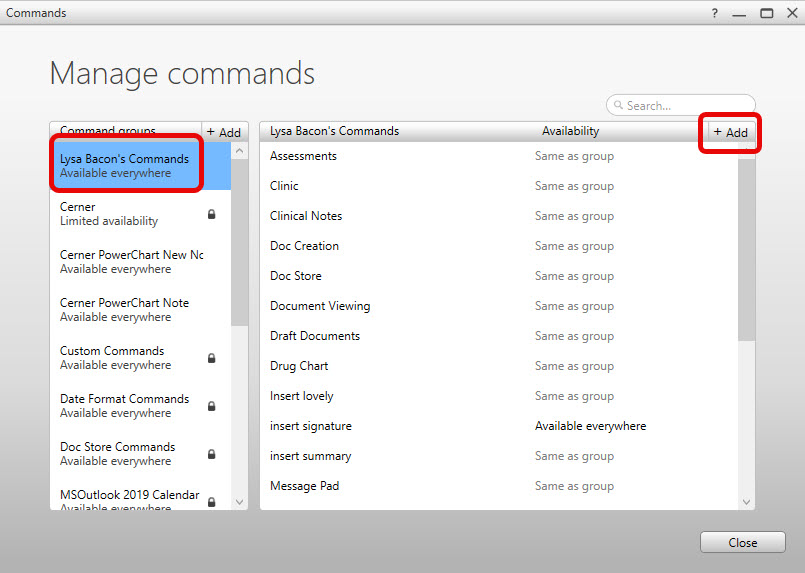
- Commands within that group will be displayed to the right side of the window.
- Click +Add in the top right corner to create a new command.
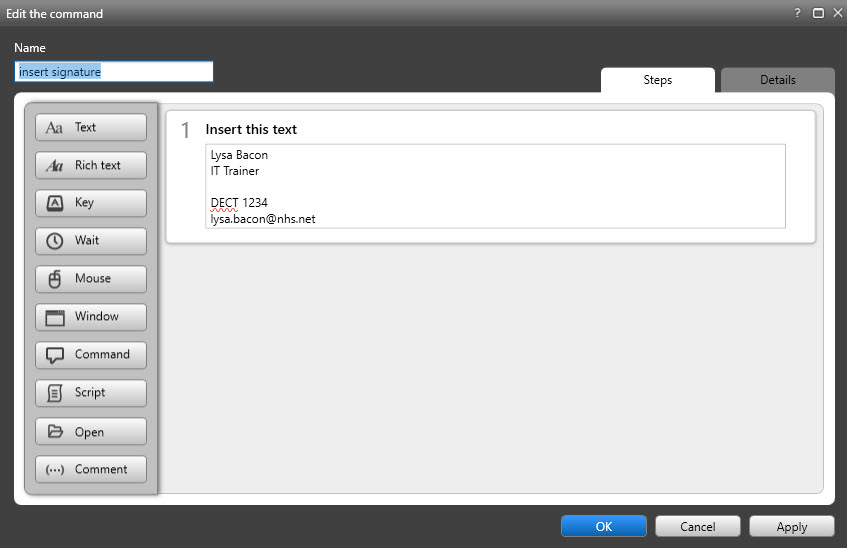
- The Add a command window opens.
- Give the command a name.
Tip: Keep the command name simple to pronounce. Capitalize the first letter of each word in the command name. Spell out numbers rather than using the numerals. Use an “action verb” at the beginning of each command name. Marke sure the command is more than one word.
- In the Steps tab, choose “Text”.
- Type the signature text into the text field.
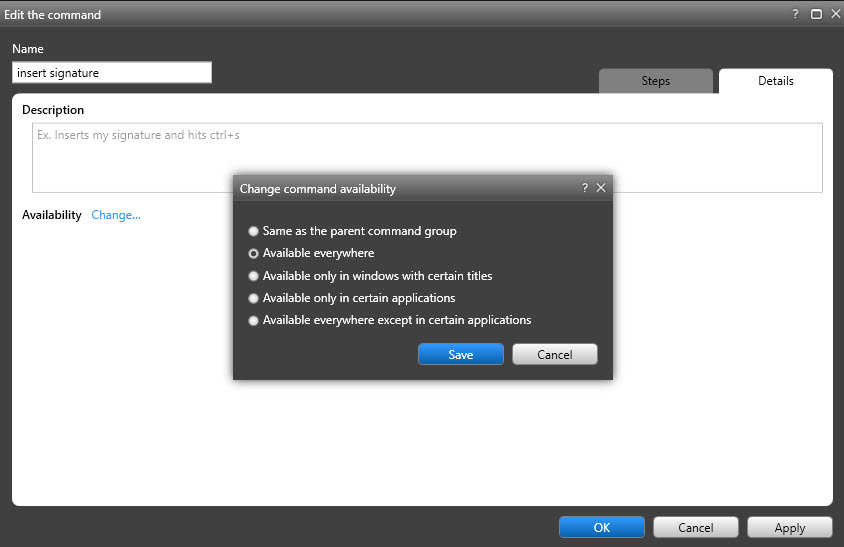
- The Details tab is useful if you wish to write a description for this command. You can also set command availability to be everywhere, only in certain applications, etc.
Click Save.
- Click Apply and then click OK.
- To use your new Autotext, place the cursor where you wish to insert. Press Play and say “insert signature”.
- When finished, you have several options:
- Select Save as Draft if your document requires review by a clerical administrator.
- Select Save and Finalise if no review is required and you are not a signing clinician.
- Select Sign and Send if no review is required and you are a signing clinician.
You must stop the recording BEFORE the document is saved as a draft. If you do not, NO AUDIO WILL BE RECORDED.
To stop recording, either release the Record button on the SpeechMike, or click the microphone icon on the Pill so that it is no longer green.
Once the document has been saved as a draft, the audio file is stored against it and cannot be amended.
For example, a document is saved as a draft after the first round of dictating. If the author returns later and edits the document, NO NEW AUDIO WILL BE RECORDED against it. The audio file will not expand to include the new dictation. Only the voice recognition typing will work.
Here is the workaround:
- Duplicate the letter that you wish to edit.
- Dictate as per usual.
- Save the letter and the newly dictated audio file is available. Please note, the audio file for this letter only contains new content. It does not append new content to old content.
- Don’t forget to reject the original letter, when appropriate, so that only one copy, the edited copy, remains.
- If your document requires review by a clerical administrator, you may choose to communicate with them verbally, via email or Message Pad.
To use Message Pad:
- Select Message Pad in the blue menu bar at the top of the document.
- Click on New Message.
- Select message Priority.
- Type message.
- Click Add to save.
- The clerical administrator will see the message in Typing Shelf and action accordingly.
- Dictate one letter for one patient at a time. Save as Draft before moving on to the next patient.
- Always check the MRN in the Pill matches that of the record you are going to dictate against.
If you find that an MRN is stuck in the pill / not dictating against a patient record, press Play and say “Clear MRN”. This removes the association of the dictation to a patient. Reassociation can be achieved by opening the patient record again or looking at a page within it.
- Remember, if the pill is green, audio is recording, and voice recognition typing is working.
- For best results, train your profile by correcting words and build up your dictionary.
- If you find that your voice recognition is poor, particularly if you have not had the time to train your profile in the past, as a last resort, you can request via Service Desk to have your profile deleted/reset. It is only the recognition profile that will be reset; all autotext, commands and dictionary items will remain the same.